Thursday 25 October 2012

Wordpress Installation in Cpanel


Step 1: Download the installation archive from the WordPress download section (http://wordpress.org/download/) by clicking on "Download.zip" or "Download.tar.gz". This way you will get the latest stable release of the WordPress application.

Step 2: When you are in cPanel -> File Manager, navigate to the uploaded file and extract it by clicking on "Extract". The other option is to extract the file on your computer and then to upload the content in the desired folder via FTP.

Step 3: You have to create a Mysql database and a database user and then assign that user in to the database with full privellages.

Step 4: Then you have to run the installer,With the new version of WordPress, you don’t have to edit your config. file anymore. Simply type the url of the directory where it was installed.

    For example: www.yourdomain.com/blog/


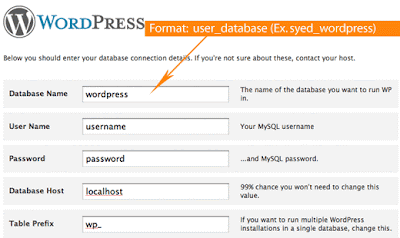
In cpanel case, you will need to add user_database format when you enter the name of your database. Enter the database you created in the step 2. Enter the username and password and thats it. You don’t need to change Database host and wp_prefix field.
Once you hit the submit button, it will take you to a follow up page like this :


Make sure that you check the box off if you don’t want this blog to be seen by search engines. For businesses, keep it on so you can be discovered. Make sure you enter a valid email because if something goes wrong, and your browser decide to shut off on you, and you didn’t get to copy the random password, it can send the password to you. Once you click install, a confirmation screen like below would appear:


After the step above, your installation is now complete and you can login to your WordPress admin panel by going to:

http://www.yourdomain.com/wp-admin
Eventhough the install is complete, there is more that awaits you such as choosing the right theme, plugins, and advertising your blog.

Wednesday 24 October 2012

Tuning Mysql Performance with Mysql tuner


MYSQL Tuner :-  It is a perl script that analyzes the MYSQL performance and based on the statistics , it gathers and give us an idea about the parameters need to be changed in the my.cnf file to increase the MYSQL performance.

Download Mysql Tuner script as follows:

# wget http://mysqltuner.com/mysqltuner.pl

Then, make the script executable by running

# chmod +x mysqltuner.pl

Run the script

# ./mysqltuner.pl

This is how you can run the mysql tuner script. Then, you will obtain the output as:

------------------------------------------


General recommendations:
    Run OPTIMIZE TABLE to defragment tables for better performance
    MySQL started within last 24 hours - recommendations may be inaccurate
    Enable the slow query log to troubleshoot bad queries
    When making adjustments, make tmp_table_size/max_heap_table_size equal
    Reduce your SELECT DISTINCT queries without LIMIT clauses
    Set thread_cache_size to 4 as a starting value
    Increase table_cache gradually to avoid file descriptor limits
    Your applications are not closing MySQL connections properly
Variables to adjust:
    query_cache_size (>= 8M)
    sort_buffer_size (> 8M)
    read_rnd_buffer_size (> 256K)
    tmp_table_size (> 20M)
    max_heap_table_size (> 20M)
    thread_cache_size (start at 4)
    table_cache (> 64)
    innodb_buffer_pool_size (>= 29M)

------------------------------------------------------

By adjusting the parameters listed in " Variables to adjust ", we can increase the performance of mysql

Tuesday 23 October 2012

Tweaking Apache in WHM


Apache is the number one Web server running on Linux systems. There are a number of little things that can be done to tune Apache performance and to lessen its impact on system resources. One of these things is tweaking the memory usage.

By default, Apache allocates a maximum number of 256 simultaneous client connections, or 256 processes (one to serve each request). With this setting, a heavily-trafficked site would be taken down in moments (even if you assume 5 MB per process, 1.3 GB of RAM would be required to satisfy that number of requests). If nothing else, it would cause the system to thrash the hard disk by attempting to use swap to handle what can't fit into physical memory.

Inorder to Tweak the apache settings in WHM go to :

Main >> service configuration >> Apache configuration >> Global configuration

Other settings to tweak include the KeepAlive, KeepAliveTimeout, and MaxKeepAliveRequests settings. Recommended settings, which can all be set in the configuration, would be :

----------------------------------
 ServerLimit 150

 MaxClients 150

 KeepAlive On

 KeepAliveTimeout 2

 MaxKeepAliveRequests 1000
----------------------------------

By decreasing the KeepAliveTimeout from 15 seconds to 2 seconds, the MaxClients directive can be increased; 19 is pretty small, and 128 is much better. By reducing the number of seconds that a process can live, you can enable more connections in the same amount of time.


MaximumKeepAlive requset is actually the maximum number of requests to serve on a TCP connection. If you set it up to 100, clients with keepalive support will be forced to reconnect after downloading 100 items. By increasing the value to 1000, The clients can download a full page with a single connection. Bumping that value didn't had any negative impact, it only made everything more faster.


Please save the edited configuration

The value of the MaxClients can be increased if you have sufficent memmory to handle the request.

Monday 22 October 2012

Social Engine Installation


Before installing social engine you need to create a Mysql database and database user with a strong password. Please also add the user to the database and assign  all privellages on to the database user.

You can download a copy of SocialEngine from the client area of our website :

http://www.socialengine.com/sign-in

Create a directory on your server where SocialEngine will be placed (e.g. "/socialnetwork") or, if you wish, you can simply use your existing HTTP root directory (e.g. "/httpdocs", "/public_html").

Download the SocialEngine4 ZIP file and extract it's contents to your computer.

Upload all the extracted files to your server.

Point your browser to the directory where your SocialEngine files were uploaded (e.g. "http://www.example.com/socialnetwork", "http://www.example.com").

Step 1: Enter your License Key :

Enter your SocialEngine license key and click Continue


Step 2: Check Requirements


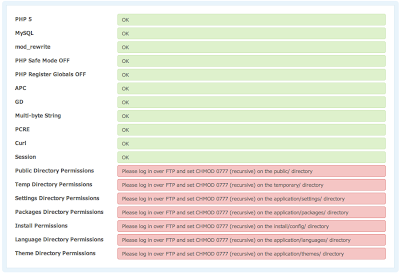
Most of the requirements listed on this page should already be meet if your server meets the minimum requirements required by SocialEngine. If your server does not meet the minimum requirements, please contact your hosting provider.

f you are using a Unix server (or Unix variant, like Linux, OS X, FreeBSD, etc.), 777 permissions must be applied to the following directories:

    /install/config
    /temporary
    /public
    /application/themes
    /application/packages
    /application/languages
    /application/settings/

To apply permissions to these directories manually login over FTP and recursively set the permissions of the directories listed above to 777. To have SocialEngine set the permissions for these directories automatically, click on the "do it automatically" link.

Step 3: Select your connection type


If you select FTP/FTPS as your connection type, enter your FTP information and click Continue.

NOTE: If you are not sure what the path is to your SocialEngine installation directory, set the FTP Path to "/" and select "Search for SocialEngine Path". The     installation wizard will automatically find the correct file path to your SocialEngine installation directory.

 If you select None as your connection type, enter the path to your SocialEngine installation directory click Continue.


After SocialEngine has found and set the necessary permissions, click the Retry Requirements Test button to check the requirement once more.


  If all requirements have been meet, click the Continue button to proceed to step 3.


 Step 3: Setup MySQL Database

    Enter your MySQL database information and click Continue.


  If SocialEngine is able to connect to your database, click the Continue button to proceed


If SocialEngine is able to create your database tables successfully, click the Continue button to proceed to step 4.


 Step 4: Create Admin Account

  Enter the name of your SocialEngine website, profile information and click Continue.


 Congratulations! SocialEngine has been installed successfully. You are now ready to login to your SocialEngine administration system and build your social network


Friday 19 October 2012

Black List Removal

Steps to be followed when your IP address is Blacklisted :

If your Domain-Name or IP Address is blacklisted at any ISP, you need to send them a  request them to be removed from their blacklist (de-listed).

 Here are the basic steps that you should follow for the whitelisting/de-listing  procedure at the ISP in question:

 a) You should follow the URL links & apply for whitelisting/de-listing using their  online form.

                           or

 b) You should send an email to the mentioned email address.

List of ISP's :

--------------------------------------------------------------------------------------------------
Comcast:
  Follow this URL: www.comcastsupport.com/rbl
  Fill out the online form & submit.
 
  Cox:
  Follow this URL: http://postmaster.cox.net/confluence/display/postmaster/Error+Codes
  On the page, search the listed error codes to match the one you received when you were blacklisted. Click the URL suggested to get to the appropriate online form.      Then submit.
 
  EarthLink:
  Send an email to: blockedbyearthlink@abuse.earthlink.net
  Use the subject line <Blocked 'insert your email server's IP'> (example: Blocked 255.255.255.2555)
  More details are given on these pages:
  http://earthlink.net/block
  http://support.earthlink.net/articles/email/email-blocked-by-earthlink.php
 
  Gmail:
  Read Gmail's Bulk Senders Guidelines here: http://www.google.com/mail/help/bulk_mail.html
  Then follow this URL for the Bulk Sender Contact Form: http://mail.google.com/support/bin/request.py?contact_type=bulk_send&hl=en
  Fill out & submit.
 
  Hotmail:
  Follow this URL: https://support.msn.com/eform.aspx?productKey=edfsmsbl&ct=eformts
  Fill out the online form & submit.
  AT&T/SBC Global/Bellsouth:
  Follow this URL: http://rbl.att.net/cgi-bin/rbl/block_admin.cgi
  Fill out the online form & submit.
  For questions related to a request, please contact them at: abuse@rbl@abuse-att.net
  Juno/NetZero/Bluelight (United Online):
  Follow this URL: http://www.unitedonline.net/postmaster/blocked.html
  Fill out the online form & submit.
  Roadrunner/Adelphia:
  Follow this URL: http://security.rr.com/mail_blocks.htm
  Follow this URL to find whether your IP is blacklisted: http://security.rr.com/cgi-bin/block-lookup

  USA.NET:
  Follow this URL to find whether your IP is blacklisted: http://postmaster.usa.net/html/error.html

  Verizon:
  Follow this URL: http://www2.verizon.net/micro/whitelist/request_form.asp?id=isp
  Fill out the online form & submit.
 
  Yahoo:
  Follow this URL: http://help.yahoo.com/l/us/yahoo/mail/postmaster/bulkv2.html
  Fill out the online form & submit.

  Mail.ru:
  Follow this URL for the Google page translator tool: http://translate.google.com
  Check "Translate from Russian" and "Translate to English"
  Enter this link in the form: mail.ru/notspam/ Then and hit Enter or Return.
  Read and follow the directions on the newly translated page.
 
  AOL.com:
  If you have been blacklisted, visit AOL Postmaster
  You will need to open a Postmaster Support Request to put yourself on AOL's whitelist
  (*The AOL whitelist is meant for permission-based bulk senders. Bear in mind that if you are on their blacklist, you may have done something to violate their      technical guidelines or best practices)
  You can also apply for Whitelist Status immediately.
-----------------------------------------------------------------------------------------------------

     List of Blacklist's [RBL/DNSBL]:

  -----------------------------------------------------------------------------------------------------

 
  Lashback:
  Follow this URL to find whether your IP is blacklisted:
  http://www.lashback.com/support/UBLQuery.aspx
  Fill out the online box and follow the links.
 
  BarracudaCentral:
  Follow this URL to find whether your IP is blacklisted: http://www.barracudacentral.org/lookups
  Then follow this URL: http://www.barracudacentral.org/rbl/removal-request Fill out the online form &   submit
 
  Spamhaus:
  Follow this URL to find whether your IP is blacklisted: http://www.spamhaus.org/lookup.lasso
  Fill out the online form, submit and follow appropriate links.
 
  Surbl:
  Follow this URL to find whether your IP is blacklisted: http://george.surbl.org/lookup.html
  Fill out the online form & submit.
 
  Invaluement.com:
  Follow this URL to find whether your IP is blacklisted: http://dnsbl.invaluement.com/lookup/
  Fill out the online form & submit.
 
  DNSBL Manitu:
  Follow this URL to find whether your IP is blacklisted: http://www.dnsbl.manitu.net/
  Fill out the online form & submit. You can also send an email to the link provided.
 
  Uribl:
  Follow this URL to find whether your IP is blacklisted: http://lookup.uribl.com/
 
  Hostkarma blacklist:
  http://ipadmin.junkemailfilter.com/remove.php Fill out the online form & submit.
 
  Spamcop:
  http://www.spamcop.net/fom-serve/cache/298.html For network and server administers.
  http://www.spamcop.net/fom-serve/cache/405.html For bounce message recipients and end-users.
  http://www.spamcop.net/bl.shtml Blacklist IP look-up
----------------------------------------------------------------------------------------------

SPF records


An SPF record is a type of Domain Name Service (DNS) record that identifies which mail  servers are permitted to send email on behalf of your domain.SPF is an open standard  created to stop forgery of From addresses. SPF helps mail servers distinguish forgeries  from real mail by making it possible for a domain owner to say, "I only send mail from  these machines". That way, if any other machines try to send mail from that domain, the  mail server knows that the From address is forged.


  Creating SPF records
 -----------------------

  You can create the spf records for the domains from this link :
 
  http://www.microsoft.com/mscorp/safety/content/technologies/senderid/wizard/

 Checking SPF records for a Domain
 ----------------------------------------

You can check if a Domain have valid SPF record via :

 http://mxtoolbox.com/spf.aspx

  Performing a Dig search :

  Dig +trace Domain name txt

  Will display a result like : v=spf1 include:spf.intermedia.net ~all  or 
  v=spf1 A:my_smtp_server_name include:spf.intermedia.net ~all


Litespeedserver Installation in WHM


 You can install litespeed on a WHM/Cpanel server by simply following the bellow steps :

 Log into server via SSH as ‘root’ user.

 Go to /usr/src

 cd /usr/src

 Download the installation file using wget.

 wget http://www.litespeedtech.com/packages/cpanel/lsws_whm_plugin_install.sh

 chmod 700 lsws_whm_plugin_install.sh

 sh lsws_whm_plugin_install.sh ( ./lsws_whm_plugin_install.sh)

 rm -rf lsws_whm_plugin_install.sh

 Log into WHM. Go to manage pluggins section.

 Start the installation procedure by clicking on ‘Install LiteSpeed’.

 This will ask you to enter your license information and admin password. Enter these information and click     on ‘Build matching PHP Binary. (Please do not tick the box to  start LiteSpeed immediately).

 Click on ‘Switch to LiteSpeed’

 Click on ‘Admin Web Console’ and login

 Final stages of setup

 Go to Configuration > General > Index Files > Edit

 You need to set the following and save.
 ===============================================
  Index Files: index.html, index.php, index.php5, index.htm
  Auto Index: Yes
  Auto Index URI => /_autoindex/default.php
 ===============================================
 
  In SSH Type:

  ln -sf /usr/local/lib/php/autoindex /usr/local/lsws/share/autoindex
  ================================================

  Go to Configuration > Log > Server Log > Edit

Set the following:
 ===============
 Log Level: Info
 Debug Level: None
 ===============

 Finally click on Actions > Graceful Restart to make these changes permanent.

 Now, you have successfully installed Litespeed on WHM/cpanel server.

Thursday 18 October 2012

RAID


Almost all modern servers are shipped with RAID controllers – redundant array of independent disks. Despite the fact that this technology was invented more than twenty years ago, nowadays the importance of it can scarcely be exaggerated.

So let’s consider various RAID types. No difference which Linux distribution you use – Ubuntu, Fedora, Debian, etc. – there are three types of RAID:

1. software
2. hardware
3. on-board solutions (sometimes called “fake RAID” or “host RAID”).

Software RAID

In the simplest case you have only software RAID. It could be determined without any software just by looking at /proc/mdstat file.

/proc/ is a Linux pseudo-filesystem which kernel uses for keeping various system parameters including this one. In spite of it’s just a file it’s very useful for managing and monitoring software RAID. If you have software RAID you will see something similar to the following:

[root@storage ~]$ cat /proc/mdstat

Personalities : [raid1] [raid10]
md2 : active raid10 sda3[0] sdd3[3] sdc3[2] sdb3[1]
959194880 blocks 64K chunks 2 near-copies [4/4] [UUUU]
md1 : active raid10 sda2[0] sdd2[3] sdc2[2] sdb2[1]
17385216 blocks 64K chunks 2 near-copies [4/4] [UUUU]
md0 : active raid1 sda1[0] sdb1[3] sdd1[2] sdc1[1]
96256 blocks [4/4] [UUUU]unused devices:

Besides you can simply run df command and if you see md devices it means you have software RAID :

[root@storage ~]$df -h

Filesystem Size Used Avail Use% Mounted on
/dev/md2 915G 512G 403G 56% /
tmpfs 5.9G 1.6M 5.9G 1% /dev/shm
/dev/md0 92M 43M 44M 50% /boot

To figure out your RAID level you should check first line of each device description :

For instance,

md2 : active raid10 sda3[0] sdd3[3] sdc3[2] sdb3[1]
As you can see here we have block device md2 that has level 10 (or 1+0 if you will). String “sda3[0] sdd3[3] sdc3[2] sdb3[1]” means that we have four devices (or more exactly partitions) in our RAID device md2. Four U letters in brackets [UUUU] indicate that all of our devices are active. So if you need check your software status you can do that just by checking /proc/mdstat. If one or more HDD failed you will see something like this:

[root@fs ~]$ cat /proc/mdstat

Personalities : [raid6] [raid5] [raid4]
md0 : active raid6 sdh1[4] sdg1[3] sde1[1] sdb1[5] sda1[0]
1953545728 blocks level 6, 128k chunk, algorithm 2 [6/5] [UU_UUU]
unused devices:

At this point you can stop reading if you are sure you have only one RAID controller and it’s software one on your server.

Hardware RAID

Inorder to detemine hardware raid, It would be a good idea to install all necessary software from the very beginning.You might need lshw and or lspci.

If your server is run by Ubuntu or Debian use aptitude or apt-get to install them:
[root@fs ~]$ aptitude install lshw lspci

If your choice is RPM-based system such as Fedora or Centos use yum:
[root@fs ~]$ yum install lshw lspci

Once you have these tools you can use them to find your RAID type.

Run

[root@storage2 ~]# lspci | grep -i raid

03:00.0 RAID bus controller: 3ware Inc 9690SA SAS/SATA-II RAID PCIe (rev 01)
Subsystem: 3ware Inc 9690SA SAS/SATA-II RAID PCIe

In most cases this output is your actual RAID controller. To check it use lshw.


On-board RAID controllers

Some motherboards contain a chipset with RAID functions. It is a device with simple functions like XOR and the other simple ones. Sometimes such controllers called fake RAID. One important thing about on-board RAID is HDDs mapped via /dev/mapper/chipsetName_randomName.
 So you can always check them out with these files. To verify if your RAID controller is an on-board solution you need to check you motherboard specification. To find you motherboard model use lshw or dmidecode.

Base Board Information
Manufacturer: MICRO-STAR INTERNATIONAL CO., LTD
Product Name: MS-7142
[root@storage6 ~]# lspci -vv | grep -i raid

00:08.0 RAID bus controller: Promise Technology, Inc. PDC20270 (FastTrak100 LP/TX2/TX4) (rev 02)

To check which controllers contain our motherboard we should check its specification.
So it really contains on-board RAID controllers so it’s a fake RAID.

To check its status we can use dmraid tool.
[root@storage7 ~]# dmraid -r

/dev/hde: pdc, "pdc_cbeedhjag", mirror, ok, 156301312 sectors, data@ 0
/dev/hdg: pdc, "pdc_cbeedhjag", mirror, ok, 156301312 sectors, data@ 0

Wednesday 17 October 2012

Mosquitto installation on Centos


Mosquitto is an open source (BSD licensed) message broker that implements the MQ Telemetry Transport protocol version 3.1. MQTT provides a lightweight method of carrying out messaging using a publish/subscribe model. This makes it suitable for "machine to machine" messaging such as with low power sensors or mobile devices such as phones, embedded computers or microcontrollers like the Arduino.

Add the CentOS mosquitto repository to YUM's list of repositories :

 cd /etc/yum/yum.repos.d

wget http://download.opensuse.org/repositories/home:/oojah:/mqtt/CentOS_CentOS-5/home:oojah:mqtt.repo

 yum update

yum install mosquitto

If you are getting the error :

---------------------------------------------------
useradd: unknown group mosquitto
warning: user mosquitto does not exist - using root
warning: group mosquitto does not exist - using root
----------------------------------------------------

This can be fixed using manually creating the missing user group details.

  useradd  mosquitto
  groupadd mosquitto

You can find the configuration file at :
/etc/mosquitto/mosquitto.conf

Finally start mosquitto as a daemon with the line, /etc/init.d/mosquitto start

You get the following status :
--------------------------------------
# /etc/init.d/mosquitto start
Starting Mosquitto MQTT broker [ OK ]
--------------------------------------


Mounting SSHFS remote directory in Fstab


Sshfs is used to mount  a remote directory on another server to our local server.This can be done by installing the sshfs package and a package named fuse.

The mounting is done as below :

sshfs USERNAME@HOSTNAME_OR_IP:/PATH LOCAL_MOUNT_POINT SSH_OPTIONS

sshfs sessy@mycomputer:/home/sessy /mnt/sessy -C -p 9876

To unmount the remote system :

fusermount -u LOCAL_MOUNT_POINT

To mount it again :

fusermount -u LOCAL_MOUNT_POINT

We have to do ssh-keygen inorder to avoid asking the password upon mounting.

This can be done as below :

Create private and public keys using ssh-keygen commands

ssh-keygen

This will generate  private key in /root/.ssh/id_rsa and public key in /root/.ssh/id_rsa.pub

Then copy the content in id_rsa.pub to users /.ssh/authorized_keys file in remote server from which we are mounting

You can use scp to copy the file.

Then try to connect it using sshuser2remotehost ,this time password will not be asked.

Then mount is on fstab using the following settings :

sshfs REMOTEUSER@REMOTE:REMOTEMOUNTPOINT LOCALMOUNTPOINT -pREMOTEPORTNUMBER -o uid=LOCALUSERID -o gid=DESIREDGROUPID -o idmap=user -o IdentityFile=/root/.ssh/YOURKKEYFILE -o allow_other

Eg:sshfs#user@remote.com:/home/user/audio /var/www/html/audio

fuse

IdentityFile=/root/.ssh/id_rsa,idmap=user,allow_other,port=10022,uid=0,gid=0,rw,nosuid,nodev

0 0

Reference : http://ewald.tienkamp.nl/2010/01/19/mounting-a-remote-file-system-over-ssh-using-sshfs-and-non-standard-settings/

Tuesday 16 October 2012

Finding DDOS attacks


Below are some of the useful netstat commands to check during DDOS attack.

To list the connections to the target IPs (server's IP's) use the below command : 


netstat -alpn | grep :80 | awk '{print $4}' |awk -F: '{print $(NF-1)}' |sort |uniq -c | sort -n


To list the connections from source IP's use the below command:


netstat -alpn | grep :80 | awk '{print $5}' |awk -F: '{print $(NF-1)}' |sort |uniq -c | sort -n


To see the state of each connection and the value use the below command:


netstat -an|grep ":80"|awk '/tcp/ {print $6}'|sort| uniq -c


You can use tcpdump to identify the attacker too:


tcpdump -c -n -i eth"x" -p host IP_Address


where x can be 0 or 1,n=number(100 or 1000). If it is a VPS, it can be venet0 too. Check the Output of ifconfig.


To check if a server is under a DoS attack with netstat, it’s common to use:

netstat -ntu | awk '{print $5}' | cut -d: -f1 | sort | uniq -c | sort -n|wc -l

If the output of below command returns a result like 2000 or 3000 connections!, then obviously it’s very likely the server is under a DoS attack.

To detect a SYN flood with netstat :

netstat -nap | grep SYN | wc -l

If the output returns a value of 1032,1032 SYNs per second is quite a high number and except if the server is not serving let’s say 5000 user requests per second, therefore as the above output reveals it’s very likely the server is under attack, if however I get results like 100/200 SYNs, then obviously there is no SYN flood targetting

Checking if UDP Denial of Service is targetting the server :

netstat -nap | grep 'udp' | awk '{print $5}' | cut -d: -f1 | sort |uniq -c |sort -n

The above command will list information concerning possible UDP DoS.

The command can easily be accustomed also to check for both possible TCP and UDP denial of service, like so :

netstat -anp |grep 'tcp\|udp' | awk '{print $5}' | cut -d: -f1 | sort | uniq -c | sort -n

You can see the output as :

104 109.161.198.86
115 112.197.147.216
129 212.10.160.148
227 201.13.27.137
3148 91.121.85.220

If after getting an IP that has too many connections to the server and is almost certainly a DoS host you would like to filter this IP.

Here is how I remove hosts to not be able to route packets to my server:

route add 110.92.0.55 reject

The above command would null route the access of IP 110.92.0.55 to my server.

Later on to look up for a null routed IP to my host, I use:

route -n |grep -i 110.92.0.55


Block the IPs with high connection above using CSF or APF firewall :

csf -d IP {reason}

apf -d IP

Prestashop Installation error while connecting to Database


While installing Prestashop if you are getting the error :

"Database server was not found. Please verify the login, password and server fields."


Check and comment the following attributes :

     vi /etc/my.cnf

    skip-networking
    skip-name-resolve
    skip-host-cache
    skip-locking

Now restart the mysql service

The database will be get connected.


Adding additional Ip address in Debian OS


Open the network configuration file :

vi /etc/network/interfaces

Check the name of your network interface. You should see a line similar to this one: "iface eth0 inet static". In my case the name is eth0.

Add these lines to the end of the file:

auto eth0:1
iface eth0:1 inet static
address 192.168.1.3
netmask 255.255.255.0
broadcast 192.168.1.255
network 192.168.1.0

Replace eth0 by your network interface name. If you are adding multiple IP addresses to the same system, you can increase the number after "eth0:".

Finally,activate the new virtual network interface :

ifup eth0:1

Saturday 13 October 2012

Kloxo panel showing default page after first Installation

After kloxo first installation, if we don't reboot the server and add contents to domain, then it will load default kloxo page while we access the domain .

 To load the site contents , do the following:

#  sh /script/fixweb --server=all
#reboot

After running the script, reboot the server for the change to take effect.

Blank page loading after Plesk panel Installation


After plesk first installation, plesk panel loading blank page. Its an error caused due to license key.

Type this command :

# /usr/local/psa/admin/sbin/keymng --install --source-file <source path>

where < source path > is the license key.


Working of Email

Email is based around the use of electronic mailboxes. When an email is sent, the message is routed from server to server, all the way to the recipient's email server.
 More precisely, the message is sent to the mail server tasked with transporting emails (called the MTA, for Mail Transport Agent) to the recipient's MTA.
On the Internet, MTAs communicate with one another using the protocol SMTP, and so are logically called SMTP servers (or sometimes outgoing mail servers).
                                                                     
 The recipient's MTA then delivers the email to the incoming mail server (called the MDA, for Mail Delivery Agent), which stores the email as it waits for the user to accept it.
 There are two main protocols used for retrieving email on an MDA:

1.  POP3 (Post Office Protocol), the older of the two, which is used for retrieving email and, in certain cases, leaving a copy of it on the server.

2.  IMAP (Internet Message Access Protocol), which is used for coordinating the status of emails (read, deleted, moved) across multiple email clients.
     With IMAP, a copy of every message is saved on the server, so that this synchronisation task can be completed.

Difference between Imap amd Pop :

The main difference, as far as we are concerned here, is the way in which IMAP or POP controls your e-mail inbox.
When you use IMAP you are accessing your inbox on the central mail server. IMAP does not actually move messages onto your computer.
You can think of an e-mail program using IMAP as a window to your messages on the server.
Although the messages appear on your computer while you work with them, they remain on the central mail server.

POP does the opposite. Instead of just showing you what is in your inbox on the U's mail server, it checks the server for new messages.
Downloads all the new messages in your inbox onto your computer, and then deletes them from the server.
This means that every time you use POP to view your new messages, they are no longer on the central mail server.

Figure 1 illustrates these concepts :


Because IMAP leaves all of your messages on the central mail server, you can view these messages from any location with Internet access.
 This means the your  e-mail inbox you view from home will be the same one you see at work.

Since POP downloads new messages to your computer and removes them from the server, you will not be able to see those new messages on another computer when you check your inbox.
 Those messages exist only on the computer that downloaded them using POP.

However, if you use IMAP and create e-mail folders on the server, these folders are accessible from anywhere you read your e-mail using IMAP.
 If you use POP and create e-mail folders, they are stored locally, and you cannot access these folders from anywhere except the computer on which you created them.

For these reasons,incoming mail servers are called POP servers or IMAP servers, depending on which protocol is used


To use a real-world analogy, MTAs act as the post office (the sorting area and mail carrier, which handle message transportation).

 while MDAs act as mailboxes, which store messages (as much as their volume will allow) until the recipients check the box.

 This means that it is not necessary for recipients to be connected in order for them to be sent email.
To keep everyone from checking other users' emails, MDA is protected by a user name called a login and by a password.

Retrieving mail is done using a software program called an MUA (Mail User Agent).
When the MUA is a program installed on the user's system, it is called an email client (such as Mozilla Thunderbird, Microsoft Outlook, Eudora Mail, Incredimail or Lotus Notes).

When it is a web interface used for interacting with the incoming mail server, it is called webmail.



Wednesday 10 October 2012

Unauthorised access to database


While taking the output of the command mysqladmin proc stat, If you are getting logs like


056 | unauthenticated user | Ip address |    | Connect |      | Reading from net |


To avoid such problem add following lines in /etc/my.cnf file to avoid access for

unauthenticated user.

    root@server [~]# vi /etc/my.cnf

    skip-networking
    skip-name-resolve
    skip-host-cache
    skip-locking

Now restart the mysql service and check mysql process logs again.

By doing this we are disabling networking in /etc/my.cnf

The only limitation would be the users are not able to connect to MYSQL using an external

connection MYSQL manager,But they can still use PHPMyAdmin via cpanel.

You can also block the Ip address using Csf :

Csf -d Ip address {unauthenticated mysql user}
Csf -r

Tuesday 9 October 2012

Exim commands


Shows the total no of email in qmail
  exim –bpc

Print a listing of the messages in the queue
  exim -bp

Shows no of frozen emails
  exim -bpr | grep frozen | wc -l

To remove FROZEN mails from the server
  exim -bp | exiqgrep -i | xargs exim -Mrm
  exiqgrep -z -i | xargs exim –Mrm

To shows the domain name and the no of emails sent   by that domain
  exim -bp | exiqsumm | more

Following command will show path to the script being utilized to send mail

  ps -C exim -fH eww
  ps -C exim -fH eww | grep home

  cd /var/spool/exim/input/
  egrep "X-PHP-Script" * -R

Check for spamming if anybody is using php script for sending mail through home

    tail -f /var/log/exim_mainlog | grep home

If anyone is spamming from /tmp

    tail -f /var/log/exim_mainlog | grep /tmp


To display the IP and no of tries done by the IP to send mail but rejected by the server.

    tail -3000 /var/log/exim_mainlog |grep ‘rejected RCPT’ |awk ‘{print$4}’|awk -F\[  '{print $2} '|awk -F\] ‘{print $1} ‘|sort | uniq -c | sort -k 1 -nr | head -n 5


Shows the  connections from a certain ip to the   SMTP server

   netstat -plan|grep :25|awk {‘print $5′}|cut -d: -f 1|sort|uniq -c|sort -nk 1


If  spamming from outside domain then you can block that domain or email id on the server

     pico /etc/antivirus.exim

Add the following lines:

    if $header_from: contains “name@domain.com”
    then
    seen finish
    endif

Following command will show you the maximum no of email currently in the mail queue have from or to the email address in the mail queue with exact figure.

    exim -bpr | grep “<*@*>” | awk ‘{print $4}’|grep -v “<>” | sort | uniq -c | sort -n


That will show you the maximum no of email currently in the mail queue have for the domain or from the domain with number.

    exim -bpr | grep “<*@*>” | awk ‘{print $4}’|grep -v “<>” |awk -F “@” ‘{ print $2}’ | sort | uniq -c | sort -n


Check if any php script is causing the mass mailing with

    cd /var/spool/exim/input
    egrep “X-PHP-Script” * -R

Just cat the ID that you get and you will be able to check which script is here causing problem for you.

To Remove particular email account email

    exim -bpr |grep “ragnarockradio.org”|awk {‘print $3′}|xargs exim -Mrm

Reading Email header

    exim -Mvh (ID)

To view a particular message body

     exim - Mvb(ID)

To view mails under a particular user

     exim -bp | grep alpha.com(domain)

To view the no of mails under a particular user

     exim -bp | grep alpha.com(domain) | wc -l

To  remove messages under the domain

      exiqgrep -f  (domain)  -i | xargs exim -Mrm

To clear the Mail queue
         
exim -bp | awk '/^ *[0-9]+[mhd]/{print "exim -Mrm " $3}' | bash 
  

Monday 1 October 2012

Mencoder & Mplayer in Centos


Essential packages :

yum install libjpeg-devel libpng-devel libungif-devel pkgconfig libdv-devel
speex-devel libmad-devel lame-devel xvidcore-devel x264-devel libmpcdec-devel
faac-devel


Download the following archives:

wget -c http://www.mplayerhq.hu/MPlayer/releases/MPlayer-1.0rc1.tar.bz2

wget -c http://www.mplayerhq.hu/MPlayer/releases/codecs/all-20071007.tar.bz2


Install the codecs:

tar xjf all-20071007.tar.bz2

mkdir -p /usr/local/lib/codecs

cp -a all-20071007/* /usr/local/lib/codecs/

cd ..

Install mencoder and mplayer:

tar xjf MPlayer-1.0rc1.tar.bz2

cd MPlayer-1.0rc1

TMPDIR=/root ./configure --prefix=/usr/local

make

make install

Once finished mencoder will be installed in /usr/local/bin/mencoder, and mplayer in /usr/local/bin/mplayer.
If there is a problem with the ivtv libraries in 64 bit environments. Just try the whole process again without ivtv - you won't need it on a webserver anyway.

cd /path-to-mplayer-src/
make clean && make distclean
./configure --disable-ivtv
make && make install

Inorder to check whether Mplayer is working :
mplayer -v

ChkRootkit


chkrootkit (Check Rootkit) is a common Unix-based program intended to help system
administrators check their system for known rootkits. It is a shell script using common
UNIX/Linux tools like the strings and grep commands to search core system programs for signatures and for comparing a traversalof the /proc filesystem with the output of the ps (process status) command to look for discrepancies.
                                                            There are inherent limitations to the reliability
of any program that attempts to detect compromises (such as rootkits and computer
viruses). Newer rootkits may specifically attempt to detect and compromise copies of
the chkrootkit programs or take other measures to evade detection by them.

Follow these steps to install ChkRootKit :

cd /usr/local/src/

wget http://www.spenneberg.org/chkrootkit-mirror/files/chkrootkit.tar.gz

tar -xvzf chkrootkit.tar.gz

Change to new directory :

cd chkrootkit-* (select the version)

Compile chkrootkit :

make sense

Run chkrootkit :

./chkrootkit

To setup a daily scan report
-----------------------------

Load crontab :

crontab -e

Add this line to the top:

-----------------------------------------------------------------------------------
0 1 * * * (cd /usr/local/src/chkrootkit*; ./chkrootkit 2>&1 | mail -s “chkrootkit

output” email@domain.com)
-----------------------------------------------------------------------------------


Securing /tmp - Server Hardening


Before securing the tmp directories, we need to understand the importance of securing

it and why we are doing this. As you know that most of the application uses /tmp

directory for storing data temporarily. So this directory can be used by rootkits,

trojans if it’s not secured properly.These are steps to secure temp directories (/tmp,

/var/tmp, /dev/shm).
We’re going to secure temp direcotries with noexec,nosuid paramaters. Before that we

need to find out whether /tmp directories are already secured. You can check this by

executing the command mount and also checking the fstab entries.

Securing /tmp
-----------------

First we need to take a backup of your present fstab entries so that if anything goes

wrong we can change it back to the old configuration.

cp -p /etc/fstab /etc/fstab_bkp

Create a separate partition for /tmp. For that we need to create a separate device with

a certain space. The space allocation is actually depending on the apps running on your

machine. Here I’m creating a separate device of size 100M and formatting it with ext3

filesystem.

dd if=/dev/zero of=/dev/tmpFS bs=1024 count=100000
mke2fs –j /dev/tmpFS

Copying existing data which is in the /tmp directory to a sperate temporary directory.

cp –pRf  /tmp /tmp_bkp

Mounting the new partition that we’ve created in the /tmp directory and setting the

necessary permissions.

mount -o loop,noexec,nosuid,rw /dev/tmpFS /tmp
chmod 1777 /tmp

Copy the old data which is int /tmp_bkp directory to the new /tmp directory.

cp –pRf  /tmp_bkp/* /tmp

Finally add the following entry to the fstab to make the changes permanent.

/dev/tmpFS /tmp ext3 loop,nosuid,noexec,rw 0 0

Now we’ve completed securing the /tmp directory.


Securing /var/tmp
--------------------

First move the contents of /var/tmp to a temporary location.

mv /var/tmp /var/tmp_bkp

Create a symlink of /var/tmp to the /tmp

ln –s /tmp /var/tmp

Lastly copy the contents back to the /tmp folder.

mv /var/tmp_bkp/* /var/tmp


Securing /dev/shm
---------------------

Edit your fstab entry and locate the line which specifies the mount point of shm.

vi /etc/fstab

And the line should be something like this.


tmpfs                   /dev/shm                tmpfs   defaults        0 0


You need to modify it with nosuid,noexec parameters.

tmpfs                   /dev/shm                tmpfs   defaults,nosuid,noexec,rw 0 0


After that remount /dev/shm

mount –o remount /dev/shm

Note: After securing the /tmp folder, you must restart the services (mysql) that uses /tmp.

.